Simple installation of the Apache web server from the Ubuntu package repository will be carried out, which will be an easy procedure. In addition, we will go over the core configuration settings and build our first web page from the ground up. The Apache web server, usually known as simply Apache, is the most popular project of the Apache Foundation, having had over a million downloads. It is also the most widely used web server on the internet.
Installing and configuring the Apache web server is simple if you follow these steps: Install the Apache web server.
Install Apache
Step 1. Install Apache2 from the Ubuntu package repository.

Configuring the Firewall
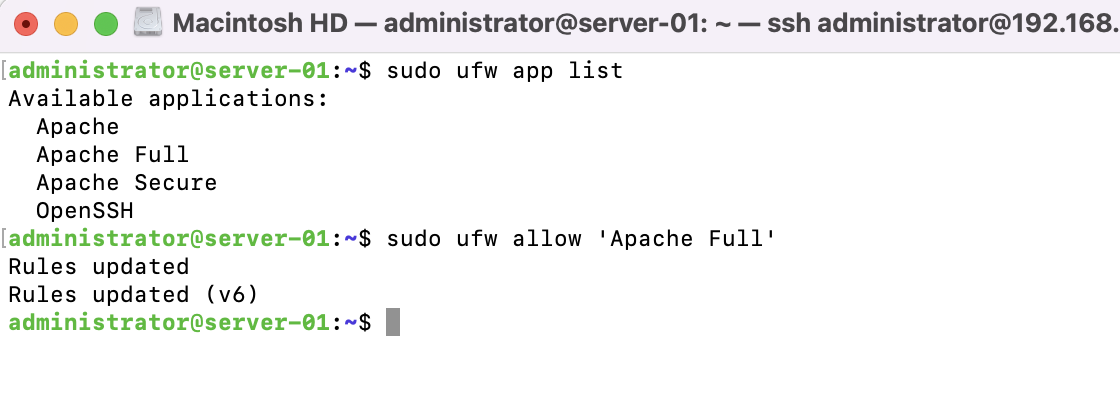
Step 2 : Before launching and testing the Apache web server, it will be necessary to make changes to the firewall configuration to allow the web server to communicate with the external world. Due to the default configuration of the HTTP and HTTPS protocols, which use ports 80 and 443 respectively, depending on which protocols are being used, either one or both of these ports will need to be opened to allow access. If your Ubuntu system is protected by the Uncomplicated Firewall, you can use the following command to allow only insecure web traffic (HTTP) to pass through:

Step 3 : To allow only secure (HTTPS) traffic, configure the following:
Step 4 : Alternatively, you can enable both secure and insecure web traffic in the manner described below:
Getting the Apache Web Server Up and Running
Step 5 : Verify that Apache2 has been successfully installed. The index.html file should be downloaded using the wget command:

Step 6 : You can also use a local machine to open a browser and point it to the server's IP address if necessary. You should see the following It works! page, which has been customized for Ubuntu:

Step 7 : Let's get started with creating our very first virtual host right away. First, create a directory structure for your files. Modify the directory structure to include a new directory for the contents of our website: /var/www.
Step 8 : Modify the directory example.com's ownership and group membership information.
Step 9 : Make sure that the file permissions are set to "secure web contents."
Step 10 : create all of the necessary directories within the example.com directory.
Step 11 : Create an index.html file in the public html directory by typing the following:

Step 12 : After that, we'll need to create a new virtual host in the Apache settings.
Step 13 : Create a backup copy of the default Virtual Host file located in the /etc/apache2/sites-available directory and use it as the starting point for our configuration as follows:

Step 14 : Change the contents of example.com.conf to match the contents of the following example. Change the following parameters according to your needs:
Step 15 : Exit the example.com.conf file after saving the changes.

Step 16 : If you are using the same port as the default VirtualHost, don't forget to disable the default VirtualHost as well:
Step 17 : Finally, enable our new VirtualHost with a2ensite and reload Apache to complete the process.

Step 18 : Open your web browser and navigate to the domain or IP address of your server (if applicable).
